6.24.2010

When Life Gives You Lemons...

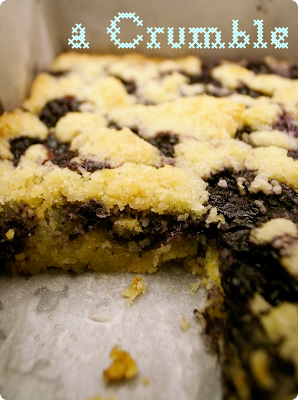
you make Blueberry Lemon Zest Crumble Bars!

I've been baking quite regularly recently, I can't say the same for my blog updates - but talking about that won't get us anywhere! Along with my baking/cooking, the big boys I mingle with have been mastering the art of starting a fire (their first attempt created a char crusted stove-top and me dizzily gasping for fresh air away from the kitchen/potential carbon-monoxide suicide scene). To their credit, it only took another get-together for them to put a boy scout to shame - what an accomplishment!

So, to accompany their perfectly charred cuts of meat, I tried out my first-ever Lemon Meringue Pie (www.joyofbaking.com). Two days later, I tested my hand again with a new recipe. Unfortunately, this entry is not about those pillowy pies - I kind of just wanted to prove that I had been practicing and not slacking off.

After work this week I've made Blueberry Crumble Bars with a Lemon Zest Twist and a Mango Olive Oil Cake.

The Blue Berry Crumble Bars were made because, well...we had some frozen blueberries (not ideal, I know), a bag of left-over lemons, some empty-bellied guests coming over - and I needed something fast after work.

I had a request from a dear friend Wei for something healthier - a word of warning - this is defiantly not it. A crumble is basically made of a bit of flour and pea-sized pieces of butter mixed with sugar. That's right - it's simple, crazy tasty, and slightly dangerous. Here's the recipe:


I halved the recipe below because Asians tend to eat desserts like fairies(ugh).

Preheat oven to 190C/375F

Grease and flour a 9x13 inch pan

1 c white sugar
1 tspn baking powder
3 c all-purpose flour
1 c unsalted butter
1 egg
1 tspn pure vanilla extract
1/2 tspn kosher salt
zest of two lemons

4 c fresh or frozen blueberries
1/2 c white sugar
3 tspn cornstarch

*As with all crumbles or puff pastries, the butter needs to be really cold. I've watched a French youtube clip about making puff pastry and the poor chef took several hours to fold and refrigerate the dough over and over in order achieve the ideal puff and flakiness. Basically, when the butter in the dough is placed in the oven, the butter releases steam and makes the surrounding dough puff up. I'm not too sure why the butter in crumbles need to be ice cold as well - I mostly just follow instructions!! The best way to do it if you don't have hours to spend tri-folding your dough and refrigerating, you can freeze your butter ahead of time (make sure it's the correct amount for your recipe first) and then use a cheese grater to grate the butter into smaller pieces - this ensures that you can get a good dough mixture without having to use your fingers to break down the butter!

  1. In a medium bowl, stir together sugar, flour, salt, lemon zest and baking powder.
  2. In a small bowl, whisk the egg and vanilla together until combined.
  3. Use pastry cutter or your food processor to blend the flour mixture with the butter and egg/vanilla mixture. Dough will be crumbly. Pat half of dough into the prepared pan. (If you don't have a pastry cutter or food processor, grate the frozen butter over the flour mixture. Gently cut together with two cold forks. When butter is pretty well coated with the flour, pour over the egg and vanilla mixture - continue to lightly bring together to a loose dough. Press half of dough into the prepared pan as mentioned above)
  4. In another bowl, stir together the sugar and cornstarch. Gently mix in the blueberries. Sprinkle the blueberry mixture evenly over the crust. Crumble remaining dough over the berry layer.
  5. Bake in preheated oven for 45 minutes, or until top is slightly brown. Cool completely before cutting into squares.

6.22.2010

The Wedding


And exactly one month later...


A few months ago, I was asked by the more beautiful half of the Cheng couple, Jessica, if I'd like to challenge my amateur dessert making skills for their wedding. The wedding cake would be out of the question. I wasn't about to ruin the first of many "best day

of their lives" by testing my hand with a multi-tiered cake. I could already imagine the humidity-hating buttercream slipping off the sides of the cake into a sad puddle...albeit a delicious one.


Instead, Jess asked if I could possibly do a dessert table. OF COURSE - I only graze over wedding, baby-shower, garden party themed websites ALL day waiting patiently for someone to ask me to tailor-design a dessert table. This was SO meant to be. And so the planning began...


On the menu:

Raspberry Buttercream Macarons

Cheesecake Pops

Decorated Vanilla Cupcakes (topped off with Lavender & Silver pinwheels)

Fortune Cookies

Milk n' Cookie Shots (Vanilla infused Panna Cotta with Chewy Chocolate Chip Cookies)


I really didn't want to do the whole cupcake thing, I mean, let's face it - they're all over the place! BUT, the chocolate covered Cheesecake Pops were sweating out of their dark chocolate coats because of the summer heat, so I had to go with a quick fix. It was the first time I decorated cupcakes, and I must say, the blog-grazing finally came in handy when I had to sketch out the designs. I went with some simple and elegant themes and stuck with lavender and a soft cream color.


The fortune cookies were a huge head-ache. I could only make three at a time and each tray had to be baked for 15 minutes. After all the hard work, they ended up getting stale the second they cooled off from the oven. Please transport me to the Sahara now, dear Kitchen God.


I think my favorite by far were the Milk n' Cookie shots - the bride sweetly told me that her amore liked simple American desserts, and what's more American than the timeless combination of a tall glass of milk with a crispy chewy chocolate chip cookie? Personally, I always trade in the glass of cold milk for another cookie - I'm not a fan of milk. This particular dessert looked cute but at the same time was a Oscar-winning version of the boy/girl next door treat.


Finally, I made them a bunch of raspberry infused macarons...those were on me, simply because I like to practice my Mac-skills, and let me tell you - practice does not make perfect with this French sweet.


If anyone wants any of the recipes that I used, let me know in the comments and I'll get back to you!

Enjoy!


5.25.2010

A Preview


4.17.2010


Soooo I've been taking the "sometimes" in thesometimes nibbler quite literally. "Sometimes" like, once every few months. I'm just going to jump right in - if you remember, a little before Christmas, I had two goals. I wanted to make macarons (check!) and bread. Not sure why, but the whole idea of having to bake with something that is, well, ALIVE (don't call PETA yet, I'm just talking about yeast) just scared me. I'm sort of a control freak and I can't really deal with failure. I always imagined each packet of yeast having its own little personality - always erratic of course (yes, I always assume the worst).
Anyway, last weekend I was inspired! I went to visit a Bagel restaurant my friend opened up in Shanghai- EGGHEAD BAGELS. It's warm little establishment, bustling with towering stacks of bagel-wiches (oh, and I won't even BEGIN to get into it's offering of gourmet cupcakes faite par C'est Cupcake). Our table ordered three turkey clubs with extra Swiss Cheese, and the matching-gloved couple next to us opted for a pair of toasted plain bagels with whipped butter. Memories of shuffling across the icy sidewalks, toes freezing because this (half) Taiwanese girl didn't know any better than to buy a pair of non-water-proofed Uggs...even before the sun had a chance to loiter up the edge of Lake Monona, I'd make a pit-stop at Einstein Bros. Bagels on State Street. A toasted cinnamon raisin bagel, crusted to perfection with a healthy lick of salted butter. I think I was able to down that baby before I even got to Memorial Library.
So there I was, inspired in a Bagel Shop in Shanghai, with memories of Madison - that's all it took for me to finally introduce myself to my very first yeast-ed bread.
As with everything else, I watched youtube videos, studied blogs and tried to understand the science of it all. What kind of flour to use and why? Why are bagels boiled? What's the story behind the "cement doughnut"? I'm not going to bore you all with those things here...but basically, there are two types. The Montreal Bagel and the holier than thou New York Bagel. That's right, I'm putting my foot down. I probably never tried a real-deal hard-knock New York-styled bagel before, but after reading about their Canadian frenemy, I'd say they better start worrying - a bagel baked in a wood burning oven MUST have some extra oomph! Just to make things clear, I definitely didn't make any Montreal Bagels - and I can't claim to have conquered the NY ones either (I wouldn't dare). I went with a simple bagel recipe from Thibeault's Table - it was totally perfect because they were mini!

Easy-peasy "you don't scare me" Bagels - (my name)

2 cups warm water
2 packs active dry yeast (I used Instant, one "pack" is 7 grams, so two packs would be 14 grams! So easy!)
3 tablespoons sugar
1 tablespoon salt
Around 5 3/4 cups bread flour (unsifted - finally!)
3 quarts water with 1-2 tablespoons of sugar
Cornmeal (no, I didn't have any)
Vegetable oil (to grease the bowl and baking sheet)
1 egg yolk beaten with 1 tablespoon of water (this is for the shiny eggwash that gives the bagels a shiny golden coat)

  1. Pour the 2 cups of warm water into a bowl. Sprinkle the yeast over the surface of the water and mix together lightly so all of the yeast particles are coated...I think that's the point of this. Anyway, you're trying to proof the yeast to make sure it's alive and kickin'. Let the mixture sit for 10 minutes.
  2. When you come back, it should have a thick-ish foam on top of the water. Yep, it stinks. If it has foamed, then congratulations, your yeast is alive, and it's probably going to be your friend today.
  3. Stir in the sugar.
  4. In a larger mixing bowl, mix together 4 cups of the flour and the salt. Just a reminder, salt will de-activate the capabilities of the yeast, so no direct contact!
  5. Pour the yeast and sugar mixture over the flour and begin to mix with a wooden spoon. The recipe I looked at called for a standing mixer, but I'm without my KitchenAid here in SH, so I rely on my guns.
  6. Slowly mix in another 1 1/4 cups of flour.
  7. No, sprinkle your work surface with lots of flour and drop your dough onto the counter.
  8. Knead (I recommend watching this on youtube - seriously) - pull up the dough and pressing down with the heel of your hand to form a ball. Do this for around 15 minutes. Feel free to throw it against the table...
  9. Place your ball of dough in a greased bowl and cover with a slightly dampened kitchen towel. Let it rise till it has doubled (40 minutes - 1 hour). The kitchen I was working in was actually quite cool, so I placed the bowl in an oven that was switched off, it sort of trapped the warmth of the dough in the oven? Meh I don't know, I'm not a professional!
  10. After it's doubled, punch down the dough.
  11. Divide into thirds.
  12. Set 2/3 of dough on your floured work surface and cover with some plastic wrap.
  13. With the other 1/3, cut into 16 pieces.
  14. Shape into bagels! youtube this please, but what I did was, ball up the dough in my palms and punched a hole with my forefinger and thumb. Then, I pulled at the sides of the hole to even it up.
  15. Let the raw bagels stand for around 20 minutes.
  16. Set the water and sugar to boil and grease your baking sheet. My sous-chef Jefferson added quite a bit of vegetable on to the baking sheet, this actually helped to crisp the base of the bagel I think!
  17. Preheat the oven now at 204 C or 400 F.
  18. After 20 minutes, turn down the water so it's just simmering, lightly drop 3 bagels at a time into the water.
  19. Cook for 30 seconds on each side. Larger bagels will need to cook for 1 minute on each side. They should be floating at the top while you do the cooking.
  20. Strain the boiled bagels and dry off on a paper towel.
  21. Place bagels onto the baking sheet and brush over with the egg wash. You can sprinkle some sesame, poppy seeds, garlic powder...etc over your bagels now if you'd like!
  22. Bake for around 20 minutes. Mine took about 17 minutes, but every oven will be different.
REAL bagels are actually supposed to "retard" over night in a refrigerator, but I wanted instant gratification - and gratification I got! Give it a go and let me know how your cement doughnuts turn out!!!


3.02.2010

Pineapple Tarts - Something Asian...finally


Call me the failed planner, I won't hold it against you. I had created a wonderful menu of sweet and savory (unbelievable, I know) goodies to give out as gifts to friends and family to celebrate Chinese New Year. They key words here are: "had" (it was planned, never materialized) and "menu" (having a menu does not necessarily equate the actual coming together of ingredients, because that would take...well...time). Let me whip out my virtual legal-pad on my phone and enlighten you all - I had: Pineapple Tarts, Savory Sesame Crisps, Matcha Macarons with Red Bean Paste filling, Orange Zest Fortune Cookies.
So the little voice in my head, which by the way talks like one of the curiously famous starlettes on The Hills kept saying, "Chinese New Year holiday lasts, like, totally long, its like, 10 days or whatever, and like, when I did the Christmas box it was so much work, it was a complete and utter travesty for my skin - to quote Cher from clueless". But in my defense, I DID end up making the Pineapple Tarts as well as the Matcha Macarons.
There are actually quite a lot of bloggers out there that make CNY-themed pastries to celebrate the season - the most popular recipe being Pineapple Tarts. These aren't the traditional Taiwanese type that we remember hauling back to the mid-west during our college years (not applicable to those that are in NYC or California). These are a Malay/Singaporean version that uses various spices (cloves, star of anise, cinnamon) in the pineapple jam, and a crumbly pastry that doesn't usually end up completely encasing the jam.
My recipe is a combination of what I learned from the wonderful Angie at Sea Salt with Food as well as Billy Law at A Table for Two. I absolutely loved the idea of shaping the tarts into mini pineapples with cloves on top. I must admit, for being such a crafty little lady, the spikes on the "pineapples" were quite difficult to maneuver with my clumsy kitchen scissors. Check out the other blogs, they did a great job of showing how to make them. I just took photos of the final product - are you beginning to question my baking-credibility?

Pineapple Jam
3 baby pineapples or 2 cans shredded pineapples
200 grams granulated sugar
1 clove
1 cinnamon stick
1 star anise
150 grams liquid glucose. this is so low fat you have no IDEA
2 tbsp all purpose flour

  1. Finely shred the pineapple till fine. This took me ages...my dad managed to take our dog out for a walk and when he came home, I was still on pineapple two. What can I say, perfectionista I am.
  2. Strain the pineapple till dry. Now that I think of it, I should have kept it for juice or something. So, do that - live and learn right? Save your pineapple juice, the lessons of life.
  3. Simmer the pineapple in a pan till the rest of the juice dries up.
  4. Add sugar and spices. Is that part of a country song perhaps?
  5. Keep stirring. Focus on those arm muscles. We'll all be body builders soon.
  6. When the mixture starts getting dry, add liquid glucose
  7. Stirrr till the jam is thick and sticky icky icky - and sort of dry
  8. Add the flour.
  9. Continue to stir until the jam is almost completely dry - it should take around 10 minutes.
  10. Let the jam cool off a bit and then shape into small ovals, around the shape of the first joint of your thumb. Is that even usable as a measuring device?
Pastry
180C
350 grams all purpose flour
50 grams corn flour (okay, I used corn starch, am I completely wrong? maybe. but they turned out all KINDS of fabulous)
250 grams unsalted butter at room temperature
50 grams icing sugar
2 egg yolks
1/2 tsp vanilla essence
1/4 tsp salt
1 egg yolk for glazing
  1. Sift together all purpose flour, corn flour and salt
  2. Cream together the butter and the icing sugar with a mixer until it gets light.
  3. Beat in egg yolks one at a time.
  4. Add in the vanilla extract.
  5. Fold in the dry ingredients. Mix everything together until it forms a dough. It should still be light and crumbly though.
  6. Scoop out around a tablespoonful of dough, roll it into an oval, use your thumb to create a little well that big enough to fit the ball of pineapple jam.
  7. Place the ball of jam into the well and wrap the surrounding dough around the visible part of the jam to cover it completely.
  8. When you finish doing this with all of your dough and jam, you're actually ready to slip them in the oven already. BUT if you want to make them look like pineapples, click on the links above - you basically cut "v" shapes with a pair of scissors across the length of the dough and stick a clove on one of the ends!
  9. When you're done decorating...or whatever, brush the rolls with the beaten egg yolk.
  10. Bake for around 20 minutes or until they come out golden brown.

3.01.2010

Puff Piece: Cream Puffs


Shall I re-introduce myself perhaps? Unfortunately, I have yet to proclaim "I have a reader comment that isn't from a family member/friend!!" like the wonderful Julie - so I'll go straight into it.

Jess bought me a beautiful cookbook for Christmas - Baking At Home with The Culinary Institute of America and flipping through it, I just completely consumed! Kinda like the Brioches grew legs and walked into my kitchen, took off their little top hats...let the buttery steam out...mmm..
There aren't as many photos as I wish there were, but it's really elegantly done. Tons of tips and techniques as well! I'm considering one day applying to the wonderful school...would the accept a vegetarian? I think they have a pastries and baking program (yes, I've already looking into it. I'm searching for sponsors...anyone? really) which probably wouldn't involve too much non-vegetarian things. So anyway, I decided to try out the Cream Puffs! As usual, I also did some research off other blogs and I found someone that tried to replicate the Beard Papa Chocolate-topped cream puffs, and omigosh - its so simple!!! I'm tempted to not share this...but alas, I'm a giving person. Ha!
SO, Pāte á Choux and Pastry Cream from the CIA cookbook, Chocolate topping from the uber cute Wendy at mybutteryfingers. There are quite a few components to this, at least for me - but I'll do it step by step here...

Pāte á Choux - you can actually make these ahead of time if you're living in a pretty dry area. The idea here is to get some volume in the center of the puff (err...hence the name) so the CIA recommends starting at a high temperature (to get the rise) and then lowering the temperature to dry the puffs out. Look at all these things I'm learning already! They better accept me when I apply. Here's what you need

1 c. whole or low-fat milk. come on - whole!!!
8 tbsp (1 stick) unsalted butter, diced
2 tbsp granulated sugar
1/2 tsp salt
1 c. bread flour, sifted
3 large eggs
1 large egg white

Preheat to 190C/375F, baking sheet lined with parchment or Silpat ♡ Also, you'll need a pastry bag with a round tip - or, like the macarons, just cut a corner off of a zip lock bag.

  1. Combine the milk, butter, sugar and salt into a saucepan over high heat and bring to a boil.
  2. Reduce the heat to medium and add the sifted flour all at once
  3. Stir well
  4. Gross right?
  5. Cook the grossness while stirring constantly with a wooden spoon. Before you know it, the grossness will pull away from the sides of the pan, takes around 5 minutes.
  6. Transfer to your standing mixer (paddle attachment) and beat on medium speed until it's cooled to body temperature.
  7. Add the eggs one at a time, beating well and scraping down the bowl with a rubber spatula after each egg.
  8. Beat in the egg white. It should be the consistency of cake-batter right now...if I did it correctly!
  9. Transfer the dough into a pastry bag.
  10. Pipe the dough into golf-ball sized balls onto the baking sheet.
  11. If you want, see below on how to Beard-Papa-ize these guys. If you want these puffs beard free, keep going...
  12. Brush the unbaked puffs lightly with egg wash (1 large egg whisked with 2 tbsp cold milk).
  13. Bake until the pastries are puffy and lightly browned (around 20 minutes)
  14. Lower the oven temperature to 162C/325F until they're a rich golden brown (another 20-25 minutes). SO MUCH WAITING.
  15. Remove from the oven and puncture a small hole in the side of each of the puffs. I learned this from another blog...you need a little hole on the side of the puff to help the steam release from the center. It's a big no-no to have moist-centered puffs, and that happens when the steam is trapped.
Chocolate Topping

40g cake flour
10g cocoa powder
50g unsalted butter
50g granulated sugar

  1. Cream together the butter and sugar. I know...we're always creaming.
  2. Fold in the flour and cocoa powder.
  3. Put the dough on a piece of plastic wrap and press together to form a log - kind of like the icebox cookies that we made before...
  4. Chill the logs for at least 30 minutes or until the dough is stiff.
  5. Slice into around 20 portions, or however many puffs you are planning on baking.
  6. Place one chocolate slice on each of the (unbaked) puffs.


Pastry Cream - an OH MAN is this good. If you have any left over, you will most likely feel the urge to use it to dip, spread, baste, marinate....yes - that good. I made this more than a month ago and I can still smell the creamy vanilla.

1/4c. cornstarch
3/4c. sugar (divided use)
2c. while milk (divided use)
4 large egg yolks, lightly beaten (use the egg-whites for you macarons, dolls! PS. I made some Matcha and Red Bean Paste macarons yesterday)
1 pinch salt
2 tsp vanilla extract
2 tbsp unsalted butter

  1. Combine the cornstarch with 1/4 cup sugar in a mixing bowl, then stir in 1/2 cup of the milk.
  2. Blend the yolks into the cornstarch mixture.
  3. Stir with a wooden spoon until completely smooth
  4. Prepare an ice bath (dishes that are rich in eggs need ice bathes because it helps speed the cooling process to prevent scrambled eggs from happening). Use a large bowl, but make sure it can fit the mixing bowl your mixture is in. Add ice and then enough cold water to come halfway up the side of the mixing bowl that you'll want to cool down.
  5. Combine the remaining 1 1/2 cups milk with the remaining 1/2 cup sugar and the salt in a saucepan over medium heat and bring to a boil.
  6. Temper the egg mixture by gradually adding about one third of the hot milk mixture, whisking constantly.
  7. Add the remaining milk mixture into the eggs.
  8. Return the mixture to the saucepan (is this confusing? time to get organized!!!)
  9. Continue cooking over medium heat while stirring vigorously with a whisk until it comes to a boil and the whisk leaves a trail in the pastry cream (5-7 minutes).
  10. When you get to that point, remove from the heat and stir in the vanilla extract and the butter
  11. Transfer to the ice bath
  12. Stir occasionally until the cream is cool
  13. Spoon into a piping bag and fill the puffs!!

Blogging is a full time job isn't it...

1.26.2010

Birthday Strawberry Shortcakes


We've always had cakes for birthdays, which is entirely fine - except my stomach seems to celebrate birthdays a lot more passionately than the birthday-persons. I prefer to skip the meal and go straight for my slice of cake (plus the left overs - which usually is more than half the cake - which I gracefully eat with my fingers the next morning, it's a little like the walk of shame when I leave the kitchen)
Anyway, after Chocolate cake after lunch, my dad requested a light Strawberry Shortcake for his birthday dessert. "Real butter or fake?" my sister asked. REAL. "Real cream or low fat *gasp". REAL. "Real shortcake? Or the cake-type?" What? Had I been eating faux strawberry shortcakes my entire life? Aren't they layers upon layers of fresh whipped cream, fluffy vanilla sponge cake and strawberries?
Let me educate. Real strawberry shortcakes are actually sweet butter biscuits baked, cut in half, and layered with fresh whipped cream and macerated strawberries - I added blueberries for my dad's big Five-Five, you know, anti-oxidants and all.
These were so simple and I'll definitely do this again for a small dinner party.


From The America's Test Kitchen Family Cookbook

Fruit
2 quarts strawberries, hulled (you can hull the berries with one of those spiky edged piping tips)
6 tablespoons sugar

Shortcakes
2 cups all-purpose flour
5 tablespoons sugar
1tablespoon baking powder
1/2 teaspoon salt
1 stick unsalted butter
2/3 cup half-and-half
1 large egg, lightly beaten
1 large egg white, lightly beaten

Whipped Cream
Whipping cream 1 cup
Sugar 1 tablespoon
Vanilla tiny splash

  1. Crush 1/3 of the strawberries with a fork or a potato masher. Slice the rest of the berries. Sprinkle sugar all over the berries and lightly mix the berries until sugar is mixed in. Let it sit at room temperature - watch the berries start to release all it's juices. You can squeeze some lemon juice on top if tartness is what suits your palette...The "maceration" will take around half an hour, but you can let it sit for longer, they won't complain.
  2. Preheat the oven to 218C or 425F.
  3. Sift together flour, sugar, baking powder, and salt. The cookbook recommends pulsing the ingredients together with a food processor, but I don't have one so I just sifted. I'm thinking the pulsing part has more to do with the next step though...
  4. You're supposed to scatter cut-up pieces of butter and then process until the mixture looks like a coarse cornmeal - BUT, because I don't own the machinery, Jess (my sister) suggested that I just use a coarse cheese grater and great the cold butter. It worked beautifully!! Remember, it's butter but can easily be mistaken for grated cheese if you're cooking on an empty stomach. It's not cheese. After grating the butter into the flour, sort of toss the bowl around so that the butter pieces get coated in the flour and leave it alone while you mix together the next part..
  5. Blend together the half and half with the whole egg and pour into the bowl with the flour/butter.
  6. Stir everything together lightly with a rubber spatula until large clumps form.
  7. Turn the mixture onto a lightly floured counter and knead lightly.
  8. I formed my own circles and placed them onto a baking tray, covered, and refrigerated until dessert time. It's good to get the butter really cold again before you bake them so it bakes into a fluffier biscuit and doesn't just sink into itself.
  9. You're supposed to brush the tops with the beaten egg white and then sprinkle with the remaining 2 tablespoons of sugar but...umm...forgot.
  10. Bake the shortcakes until golden brown (12-14 min).
  11. While you're waiting for them to cool, whip up the cream. Whip together the cream, sugar and vanilla in a chilled bowl with an electric mixer on low speed until frothy and the sugar has dissolved (1 min.) Increase the speed to high and continue to whip until doubled in volume and soft peaks form.
  12. Assemble by cutting biscuits in half - generously fill with strawberries, then a healthy dollop of whipped cream, and cap it with the top of the biscuit.

1.20.2010

Macarons: So many feet, time to buy some shoes!


OUI! I did it!!! I finally succeeded in making a batch of Macarons. Let me start by telling you kids about these little snooty French beauties I've been obsessing over for the past several months - they caused me to go into a deep blog-depression wherein a dire stalemate reared its ugly head. I don't even know how many batches I made, and I really should have taken the time to record my failures so I could report back, but guess what - HA! Failure is not someone I like to call my friend. In fact, I like to sweep failure under the Persian carpet any time possible. If you're curious, this is what under-baked failure looks like. I've censored out the actual decapitation. Taiwanese interpretation of a macaron being sold at a night market. How precious. Ms. Antoinette would weep.

Macarons:
  1. No, I haven't been spelling it wrong. Macaroons are the coconut flake cookies that are chewy...Macarons on the other hand, I cannot pronounce, but I do know that they are delicate little French cookies that sandwich a swirl of vanilla butter-cream, chocolate ganache, matcha cream...the possibilities are endless.
  2. Ingredients are super simple: egg whites, powdered sugar (preferably without starch), granulated sugar, finely ground almonds.
  3. Meringue + Sugar and Almond + mad mixing skills that would scare the Wranglers off SamRonson (aka macaronage) + an intimate relationship with your oven (don't underestimate the power of oven lovin', my friends) = macarons
  4. You want feet. Feet. FEEEEEEEEETSS! Feet are the frilly lacy bottoms that you see surrounding the bottom of each Macaron cap. If you've successfully mixed together the batter, at around 4-5 minutes in the oven, you'll begin to see the glossy cap rise up to reveal the feet. Now, to be clear, I've had feet since my very first batch - unfortunately, the caps would end up sinking in the center, or the feet would be brutally decapitated when I tried to lift the cookies off the sheet. No need for a guillotine in my kitchen...An example of perfect feet, made by Junglefrog:
  5. Do as much reading as possible before you begin. Syrup and Tang was wonderfully detailed, many people recommend David Lebovitz though I personally didn't find him all that helpful - maybe he was too professional-sounding? I bought a book called I "heart" Macarons written by Hisako Ogita. Complete and utter eye candy. Was it helpful? No. But that might be due to my very minimal macaron Chinese lexicon.
  6. Watch videos. One of the crucial parts of macaron making is the "macaronage" part. That involves mixing together the almond flour and powdered sugar mixture together with the meringue. There is a technique, so it helps a great deal if you can watch a professional do it on youtube or something. Some suggestions: FrenchfoodTV, Chefnini78
  7. There are two basic methods and the part that varies is in the meringue. The basic recipe is with a regular whipped egg-white meringue. The more stable recipe (with which I ended up succeeding with!!!) uses an Italian meringue. This is made by pouring in boiling sugar syrup into the plain meringue while it is still mixing in the mixer - more on this later.
  8. Sift, oh my gosh sift like there is no tomorrow. These are very unforgiving desserts.
I guess I should get on with the recipe...there are a million other tips I can be offering at this point but most importantly - become obsessed. But let's be honest...I'd take a Chocolate Chip Cookie over a bedazzled macaron any day.

Basic Proportions for a macarons au sucre cuit (Italian meringue method):
Ingredient Amount Example (with eggwhite=50 gm)
Almond meal
1.35 x eggwhite
1.35 x 50 = 67 gm
Icing sugar
1.35 x eggwhite
1.35 x 50 = 67 gm


Sugar
1.35 x eggwhite
1.35 x 50 = 67 gm
Water
0.33 x eggwhite
0.33 x 50 = 16 gm


Egg white


50 gm

The great thing about this is, you can alter the measurements according to how much egg white you happen to have.

  1. Measure out all of the ingredients. ALWAYS use an electronic scale to make the measurements.
  2. Use a food processor to grind together the almond meal and powdered sugar. Don't get too crazy with it - if you mix for too long, you'll most likely end up with Almond butter, which isn't all that bad!
  3. Sift two to three times and then place the powder mixture into a large bowl.
  4. Measure half of the egg white and set aside. The other half should go into another CLEAN mixing bowl. Whenever you make meringue, it is essential to have a plastic or brushed metal bowl that is completely oil-free and water free, otherwise the meringue won't be able to get going.
  5. You'll need a candy thermometer for this next part. Simmer the water and granulated sugar for a few minutes. Try not to stir the syrup, once or twice is fine.
  6. As the syrup is making it up to 118C, swivel around to your egg whites in the mixing bowl and begin to beat the life out of it. Some recipes suggest that you start out slow to break up the connecting parts of the egg white, and then move up to high. By the time you have "stiff peaks", your syrup should be at around 118C.
  7. Turn the speed of the mixer down to low and slowly pour the syrup down the side of the mixing bowl into the meringue. Yay! Scrambled egg whites! That's what I thought I would get...and there just might be some tiny scrambled egg pieces in my final product...Anyway, as soon as all of the syrup is in the meringue, turn the mixer back up to high speed. Mix for a few minutes until the meringue is warm to touch. You should have a glossy mixture now. If you want to add color, now would be the time.
  8. Pour the other half of the egg white that you had set aside into the dry mixture. Don't worry, I really did just tell you to do that. I'm really not too sure why those were the instructions, but when it comes to macarons, I bow my head and obey.
  9. Use a plastic spatula to spoon the meringue into the dry mixture.
  10. Show me your macaronage magic (watch videos for tips on mixing)
  11. It is so important that you don't over mix or under mix. It's tough, but you want to get it so the batter flows like magma.
  12. If you have a piping bag, fill it up with the batter. If not, cut a small hole in the corner of a plastic ziplock bag and use that as your piping bag! For easy batter-filling, try placing the bag in a tall drinking glass. It will hold up the bag for you while you spoon in the batter. Keeps things clean and simple.
  13. Pipe 2-3 cm circles. I'm a bit of a perfectionist so I drew circles on the bottom side of the parchment paper so I could get similar sized macarons.
  14. Time to wait...after you pipe macarons, it is best to let them sit for 20 min - 2 hours. A shell will form during this time, this helps with keeping the macarons crack-free (haha) as well as shiny. You can gently touch the tops of the batter to test the dryness.
  15. While waiting, pre-heat the oven (regular, not convection) to 160C.
  16. Place macarons in the oven for 13-14 minutes. Unlike all other cookies, they shouldn't have to brown for you to tell that the are done!! After around 4-5 minutes of bake time, you'll begin to see the feet! This is really the best part. Try hard not to open the oven at all - I found that as soon as I opened the oven door, cool air was pushed into the oven and the feet that had gained a lot of height ended up deflating.


What's with the empty macaron shells you ask? I will fill them soon after I finally set my heart on a luscious filling. And the "nipple" (yes, really) on top? Still trying to perfect the smooth finish. Not mixed enough to a magma-like consistancy is my best Dr. House diagnosis.

1.07.2010

Thumb Print Cookies


I realize it's already way past Christmas, but I've been celebrating and spending time with family! We took a semi-family (we were missing my beautiful sister Jessica, she will be arriving in a few days!) trip down to central Taiwan. I even took a mochi-making class while I was down there! And of course, during my six hour train ride, I took the opportunity to plan the many posts that will be coming up. These "Thumb Print Cookies" are the first of a series...all explaining exactly what went into that lil Christmas box of love that I sent out to my loved ones a few days before the big day. When deciding what I'd put in these boxes, I had tons of ideas...bf helped me out quite a bit! My list changed several times:
Decorated Sugar Cookies
Jelly Sandwich Cookies
Thumb-Print Cookies

Dipped Shortbread
Rum Balls

Spiced Oatmeal Raisin Cookies
Raspberry Oatmeal Squares
Peppermint Brownies


Today, I'll start off with the Thumb-Print Cookies. I made these two days before the box deliveries - they were made first because cookies tend to be more resilient when it comes to baking ahead. Because of the water-logged air in Taiwan, I was still pretty nervous about baking them ahead of time, but again, Press-and-Seal proved to work wonders and kept the cookies tasting fresh! Another thing about these cookies, don't drop the dollop of jelly until the day you serve them as it will be absorbed into the cookie and make them a bit soggy.
Trials and tribulations....I've been experiencing this for the past several weeks (remember those egg whites for the macarons...let's just say I'm STILL trying) and it all began with these Thumb Prints. I wanted to coat the cookies in coconut, and for some reason I read that it was better to toast the coconut beforehand to release the aroma of the ingredient - similar to how you would toast almonds or pecans before using them. I perched eagerly by the oven (usual position, I will make a sketch one day if you're lucky), tossing and watching for browning. You just want to get the coconut so it has a bit of a golden color, and MAN it smelled great. You'll know when it's working. Okay, well everything was going smoothly up until then. There I was in the kitchen, cookie dough in one bowl, plate full of toasted coconut in another, feeling oh-so-prepared to create a wonderfully delicate looking cookie (shredded coconut is so much prettier than chopped nuts, no?). A few minutes into the oven, aforementioned toasted coconut was getting the Lindsay Lohan treatment. A few more minutes after that, most of the coconut shreds had pulled a reverse Michael Jackson on me. Yes, I read gossip blogs every morning when I wake-up, I need to stay informed so I can make umm...colorful descriptions and analogies on my cooking blog. In a word: FAILED. This will be the first of many other failures that I will illustrate to you on this fine blog of truth. Ended up toasting some pecans, chopping them up, and rolling the cookie dough in the nuts. Boo. No fun.
177C

1/2 cup unsalted butter (room temperature)
1/4 cup granulated white sugar

1 large egg -separate whites and yolk (room temperature)

1/2 teaspoon vanilla

1 cup all purpose flour

1/8 teaspoon salt

3/4 cup toasted pecans (chopped finely)

1/2 cup jam
  1. Cream the butter and sugar until light and fluffy (2-3 minutes).
  2. Add the egg yolk and vanilla extract and beat until combined. Is this getting repetitive?
  3. In a separate bowl, sift together the flour and salt. By now I trust you all have become loyal sifters like myself?
  4. Add the flour mixture to the batter and beat just until combined.
  5. If the batter too soft to roll into balls, refrigerate for about 30 minutes. I hate waiting.
  6. Time to prepare your work area! You will now begin the process of spooning, rolling, dipping, rolling, pressing. Just to clarify...in a small bowl, whisk the egg white until frothy. Place the chopped nuts on a plate. Roll the dough into 1 inch (2.54 cm) balls. Taking one ball of dough dip first into the egg white and then roll in the nuts. So much fun!
  7. Space each cookie 1 inch apart on baking sheet. Using your thumb make a indentation into the center of each cookie and fill with about 1/4 - 1/2 teaspoon of jam. If you're baking ahead, skip adding the jam and wait until the day you serve to fill up those lil wells.
  8. Bake for about 13-15 minutes, or until cookies are set and the nuts have nicely browned.