6.24.2010

When Life Gives You Lemons...

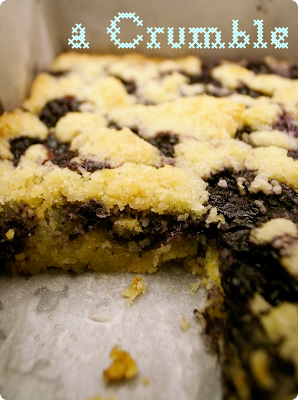
you make Blueberry Lemon Zest Crumble Bars!

I've been baking quite regularly recently, I can't say the same for my blog updates - but talking about that won't get us anywhere! Along with my baking/cooking, the big boys I mingle with have been mastering the art of starting a fire (their first attempt created a char crusted stove-top and me dizzily gasping for fresh air away from the kitchen/potential carbon-monoxide suicide scene). To their credit, it only took another get-together for them to put a boy scout to shame - what an accomplishment!

So, to accompany their perfectly charred cuts of meat, I tried out my first-ever Lemon Meringue Pie (www.joyofbaking.com). Two days later, I tested my hand again with a new recipe. Unfortunately, this entry is not about those pillowy pies - I kind of just wanted to prove that I had been practicing and not slacking off.

After work this week I've made Blueberry Crumble Bars with a Lemon Zest Twist and a Mango Olive Oil Cake.

The Blue Berry Crumble Bars were made because, well...we had some frozen blueberries (not ideal, I know), a bag of left-over lemons, some empty-bellied guests coming over - and I needed something fast after work.

I had a request from a dear friend Wei for something healthier - a word of warning - this is defiantly not it. A crumble is basically made of a bit of flour and pea-sized pieces of butter mixed with sugar. That's right - it's simple, crazy tasty, and slightly dangerous. Here's the recipe:


I halved the recipe below because Asians tend to eat desserts like fairies(ugh).

Preheat oven to 190C/375F

Grease and flour a 9x13 inch pan

1 c white sugar
1 tspn baking powder
3 c all-purpose flour
1 c unsalted butter
1 egg
1 tspn pure vanilla extract
1/2 tspn kosher salt
zest of two lemons

4 c fresh or frozen blueberries
1/2 c white sugar
3 tspn cornstarch

*As with all crumbles or puff pastries, the butter needs to be really cold. I've watched a French youtube clip about making puff pastry and the poor chef took several hours to fold and refrigerate the dough over and over in order achieve the ideal puff and flakiness. Basically, when the butter in the dough is placed in the oven, the butter releases steam and makes the surrounding dough puff up. I'm not too sure why the butter in crumbles need to be ice cold as well - I mostly just follow instructions!! The best way to do it if you don't have hours to spend tri-folding your dough and refrigerating, you can freeze your butter ahead of time (make sure it's the correct amount for your recipe first) and then use a cheese grater to grate the butter into smaller pieces - this ensures that you can get a good dough mixture without having to use your fingers to break down the butter!

  1. In a medium bowl, stir together sugar, flour, salt, lemon zest and baking powder.
  2. In a small bowl, whisk the egg and vanilla together until combined.
  3. Use pastry cutter or your food processor to blend the flour mixture with the butter and egg/vanilla mixture. Dough will be crumbly. Pat half of dough into the prepared pan. (If you don't have a pastry cutter or food processor, grate the frozen butter over the flour mixture. Gently cut together with two cold forks. When butter is pretty well coated with the flour, pour over the egg and vanilla mixture - continue to lightly bring together to a loose dough. Press half of dough into the prepared pan as mentioned above)
  4. In another bowl, stir together the sugar and cornstarch. Gently mix in the blueberries. Sprinkle the blueberry mixture evenly over the crust. Crumble remaining dough over the berry layer.
  5. Bake in preheated oven for 45 minutes, or until top is slightly brown. Cool completely before cutting into squares.

6.22.2010

The Wedding


And exactly one month later...


A few months ago, I was asked by the more beautiful half of the Cheng couple, Jessica, if I'd like to challenge my amateur dessert making skills for their wedding. The wedding cake would be out of the question. I wasn't about to ruin the first of many "best day

of their lives" by testing my hand with a multi-tiered cake. I could already imagine the humidity-hating buttercream slipping off the sides of the cake into a sad puddle...albeit a delicious one.


Instead, Jess asked if I could possibly do a dessert table. OF COURSE - I only graze over wedding, baby-shower, garden party themed websites ALL day waiting patiently for someone to ask me to tailor-design a dessert table. This was SO meant to be. And so the planning began...


On the menu:

Raspberry Buttercream Macarons

Cheesecake Pops

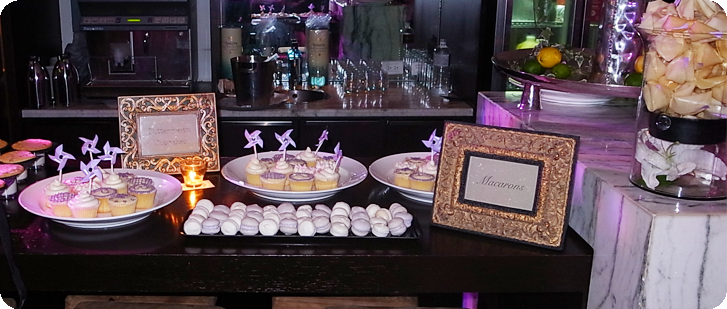
Decorated Vanilla Cupcakes (topped off with Lavender & Silver pinwheels)

Fortune Cookies

Milk n' Cookie Shots (Vanilla infused Panna Cotta with Chewy Chocolate Chip Cookies)


I really didn't want to do the whole cupcake thing, I mean, let's face it - they're all over the place! BUT, the chocolate covered Cheesecake Pops were sweating out of their dark chocolate coats because of the summer heat, so I had to go with a quick fix. It was the first time I decorated cupcakes, and I must say, the blog-grazing finally came in handy when I had to sketch out the designs. I went with some simple and elegant themes and stuck with lavender and a soft cream color.


The fortune cookies were a huge head-ache. I could only make three at a time and each tray had to be baked for 15 minutes. After all the hard work, they ended up getting stale the second they cooled off from the oven. Please transport me to the Sahara now, dear Kitchen God.


I think my favorite by far were the Milk n' Cookie shots - the bride sweetly told me that her amore liked simple American desserts, and what's more American than the timeless combination of a tall glass of milk with a crispy chewy chocolate chip cookie? Personally, I always trade in the glass of cold milk for another cookie - I'm not a fan of milk. This particular dessert looked cute but at the same time was a Oscar-winning version of the boy/girl next door treat.


Finally, I made them a bunch of raspberry infused macarons...those were on me, simply because I like to practice my Mac-skills, and let me tell you - practice does not make perfect with this French sweet.


If anyone wants any of the recipes that I used, let me know in the comments and I'll get back to you!

Enjoy!


5.25.2010

A Preview


4.17.2010


Soooo I've been taking the "sometimes" in thesometimes nibbler quite literally. "Sometimes" like, once every few months. I'm just going to jump right in - if you remember, a little before Christmas, I had two goals. I wanted to make macarons (check!) and bread. Not sure why, but the whole idea of having to bake with something that is, well, ALIVE (don't call PETA yet, I'm just talking about yeast) just scared me. I'm sort of a control freak and I can't really deal with failure. I always imagined each packet of yeast having its own little personality - always erratic of course (yes, I always assume the worst).
Anyway, last weekend I was inspired! I went to visit a Bagel restaurant my friend opened up in Shanghai- EGGHEAD BAGELS. It's warm little establishment, bustling with towering stacks of bagel-wiches (oh, and I won't even BEGIN to get into it's offering of gourmet cupcakes faite par C'est Cupcake). Our table ordered three turkey clubs with extra Swiss Cheese, and the matching-gloved couple next to us opted for a pair of toasted plain bagels with whipped butter. Memories of shuffling across the icy sidewalks, toes freezing because this (half) Taiwanese girl didn't know any better than to buy a pair of non-water-proofed Uggs...even before the sun had a chance to loiter up the edge of Lake Monona, I'd make a pit-stop at Einstein Bros. Bagels on State Street. A toasted cinnamon raisin bagel, crusted to perfection with a healthy lick of salted butter. I think I was able to down that baby before I even got to Memorial Library.
So there I was, inspired in a Bagel Shop in Shanghai, with memories of Madison - that's all it took for me to finally introduce myself to my very first yeast-ed bread.
As with everything else, I watched youtube videos, studied blogs and tried to understand the science of it all. What kind of flour to use and why? Why are bagels boiled? What's the story behind the "cement doughnut"? I'm not going to bore you all with those things here...but basically, there are two types. The Montreal Bagel and the holier than thou New York Bagel. That's right, I'm putting my foot down. I probably never tried a real-deal hard-knock New York-styled bagel before, but after reading about their Canadian frenemy, I'd say they better start worrying - a bagel baked in a wood burning oven MUST have some extra oomph! Just to make things clear, I definitely didn't make any Montreal Bagels - and I can't claim to have conquered the NY ones either (I wouldn't dare). I went with a simple bagel recipe from Thibeault's Table - it was totally perfect because they were mini!

Easy-peasy "you don't scare me" Bagels - (my name)

2 cups warm water
2 packs active dry yeast (I used Instant, one "pack" is 7 grams, so two packs would be 14 grams! So easy!)
3 tablespoons sugar
1 tablespoon salt
Around 5 3/4 cups bread flour (unsifted - finally!)
3 quarts water with 1-2 tablespoons of sugar
Cornmeal (no, I didn't have any)
Vegetable oil (to grease the bowl and baking sheet)
1 egg yolk beaten with 1 tablespoon of water (this is for the shiny eggwash that gives the bagels a shiny golden coat)

  1. Pour the 2 cups of warm water into a bowl. Sprinkle the yeast over the surface of the water and mix together lightly so all of the yeast particles are coated...I think that's the point of this. Anyway, you're trying to proof the yeast to make sure it's alive and kickin'. Let the mixture sit for 10 minutes.
  2. When you come back, it should have a thick-ish foam on top of the water. Yep, it stinks. If it has foamed, then congratulations, your yeast is alive, and it's probably going to be your friend today.
  3. Stir in the sugar.
  4. In a larger mixing bowl, mix together 4 cups of the flour and the salt. Just a reminder, salt will de-activate the capabilities of the yeast, so no direct contact!
  5. Pour the yeast and sugar mixture over the flour and begin to mix with a wooden spoon. The recipe I looked at called for a standing mixer, but I'm without my KitchenAid here in SH, so I rely on my guns.
  6. Slowly mix in another 1 1/4 cups of flour.
  7. No, sprinkle your work surface with lots of flour and drop your dough onto the counter.
  8. Knead (I recommend watching this on youtube - seriously) - pull up the dough and pressing down with the heel of your hand to form a ball. Do this for around 15 minutes. Feel free to throw it against the table...
  9. Place your ball of dough in a greased bowl and cover with a slightly dampened kitchen towel. Let it rise till it has doubled (40 minutes - 1 hour). The kitchen I was working in was actually quite cool, so I placed the bowl in an oven that was switched off, it sort of trapped the warmth of the dough in the oven? Meh I don't know, I'm not a professional!
  10. After it's doubled, punch down the dough.
  11. Divide into thirds.
  12. Set 2/3 of dough on your floured work surface and cover with some plastic wrap.
  13. With the other 1/3, cut into 16 pieces.
  14. Shape into bagels! youtube this please, but what I did was, ball up the dough in my palms and punched a hole with my forefinger and thumb. Then, I pulled at the sides of the hole to even it up.
  15. Let the raw bagels stand for around 20 minutes.
  16. Set the water and sugar to boil and grease your baking sheet. My sous-chef Jefferson added quite a bit of vegetable on to the baking sheet, this actually helped to crisp the base of the bagel I think!
  17. Preheat the oven now at 204 C or 400 F.
  18. After 20 minutes, turn down the water so it's just simmering, lightly drop 3 bagels at a time into the water.
  19. Cook for 30 seconds on each side. Larger bagels will need to cook for 1 minute on each side. They should be floating at the top while you do the cooking.
  20. Strain the boiled bagels and dry off on a paper towel.
  21. Place bagels onto the baking sheet and brush over with the egg wash. You can sprinkle some sesame, poppy seeds, garlic powder...etc over your bagels now if you'd like!
  22. Bake for around 20 minutes. Mine took about 17 minutes, but every oven will be different.
REAL bagels are actually supposed to "retard" over night in a refrigerator, but I wanted instant gratification - and gratification I got! Give it a go and let me know how your cement doughnuts turn out!!!