4.15.2012
6.18.2011
HOUSING WANTED: next to Bourke Street Bakery. Surry Hills, Sydney


- Sift the dry ingredients: flour, baking powder, baking soda, spices and salt
- Put egg whites in a very clean DRY bowl otherwise they won't make it to soft peaks
- Use an electric mixer with a whisk attachment and beat egg whites on high speed until soft peaks start forming. If you want, you can add a pinch of cream of tartar which helps to stabilize meringue. Slooowly pour in the sugar for the egg whites while the motor is still running. Stop mixing when you get to a soft peak stage.
- Transfer meringue to another bowl and set aside.
- Using the same bowl, add the whole egg, egg yolk and sugar for the yolks. Mix on high speed for 3-4 minutes or until the mixture doubles in volume and is quite airy.
- While the mixer is still going, slowly stream in the oil. If the oil is poured in too quickly, the mixture might split or deflate too much.
- Remove the bowl from the standing mixer and gently fold in the flour mixture until combined.
- Fold in carrots (and any other ingredients you might want to add, like coconut or walnuts)
- Quickly and lightly fold in the meringue - don't fold it through completely! You should still be able to see streaks of white meringue through the mix.
- Pour into the prepared tin and bake for 1 hr 10 minutes. You can check for doneness by sticking a wooden toothpick through the center of the cake - if it comes out clean or with a few crumbs, then it's done. I don't like over-cooked cake because they end up getting really dry in the center, so as long as the toothpick comes out without wet dough on it, it's pretty safe.
- Don't open the oven for the first 40 minutes. The meringue needs time to rise and bake into shape - if you open the oven, it will deflate and you'll have a crumb that is much too dense.
- IF after the first 40 minutes, the top of the cake is browning too quickly, you can drop the temperature to 180C and place a piece of foil over the cake.
- When the cake is done, allow it to cool in the tin for about 30 minutes before turning it out onto a wire rack to cool.

| Nutrition Facts | ||||||
Serving Size 101 g | ||||||
Amount Per Serving | ||||||
Calories 378 Calories from Fat 191 | ||||||
% Daily Value* | ||||||
Total Fat 21.2g 33% | ||||||
Saturated Fat 5.4g 27% | ||||||
Trans Fat 0.0g | ||||||
Cholesterol 47mg 16% | ||||||
Sodium 127mg 5% | ||||||
Total Carbohydrates 44.3g 15% | ||||||
Dietary Fiber 1.5g 6% | ||||||
Sugars 28.7g | ||||||
Protein 4.1g | ||||||
| ||||||
Nutrition Grade C | ||||||
* Based on a 2000 calorie diet |
1.11.2011
6.24.2010
When Life Gives You Lemons...
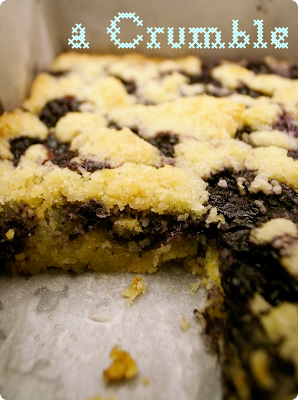
you make Blueberry Lemon Zest Crumble Bars!I've been baking quite regularly recently, I can't say the same for my blog updates - but talking about that won't get us anywhere! Along with my baking/cooking, the big boys I mingle with have been mastering the art of starting a fire (their first attempt created a char crusted stove-top and me dizzily gasping for fresh air away from the kitchen/potential carbon-monoxide suicide scene). To their credit, it only took another get-together for them to put a boy scout to shame - what an accomplishment!
So, to accompany their perfectly charred cuts of meat, I tried out my first-ever Lemon Meringue Pie (www.joyofbaking.com). Two days later, I tested my hand again with a new recipe. Unfortunately, this entry is not about those pillowy pies - I kind of just wanted to prove that I had been practicing and not slacking off.
After work this week I've made Blueberry Crumble Bars with a Lemon Zest Twist and a Mango Olive Oil Cake.
The Blue Berry Crumble Bars were made because, well...we had some frozen blueberries (not ideal, I know), a bag of left-over lemons, some empty-bellied guests coming over - and I needed something fast after work.
I had a request from a dear friend Wei for something healthier - a word of warning - this is defiantly not it. A crumble is basically made of a bit of flour and pea-sized pieces of butter mixed with sugar. That's right - it's simple, crazy tasty, and slightly dangerous. Here's the recipe:
I halved the recipe below because Asians tend to eat desserts like fairies(ugh).
Preheat oven to 190C/375F
Grease and flour a 9x13 inch pan
- In a medium bowl, stir together sugar, flour, salt, lemon zest and baking powder.
- In a small bowl, whisk the egg and vanilla together until combined.
- Use pastry cutter or your food processor to blend the flour mixture with the butter and egg/vanilla mixture. Dough will be crumbly. Pat half of dough into the prepared pan. (If you don't have a pastry cutter or food processor, grate the frozen butter over the flour mixture. Gently cut together with two cold forks. When butter is pretty well coated with the flour, pour over the egg and vanilla mixture - continue to lightly bring together to a loose dough. Press half of dough into the prepared pan as mentioned above)
- In another bowl, stir together the sugar and cornstarch. Gently mix in the blueberries. Sprinkle the blueberry mixture evenly over the crust. Crumble remaining dough over the berry layer.
- Bake in preheated oven for 45 minutes, or until top is slightly brown. Cool completely before cutting into squares.
6.22.2010
The Wedding

A few months ago, I was asked by the more beautiful half of the Cheng couple, Jessica, if I'd like to challenge my amateur dessert making skills for their wedding. The wedding cake would be out of the question. I wasn't about to ruin the first of many "best day
of their lives" by testing my hand with a multi-tiered cake. I could already imagine the humidity-hating buttercream slipping off the sides of the cake into a sad puddle...albeit a delicious one.
Instead, Jess asked if I could possibly do a dessert table. OF COURSE - I only graze over wedding, baby-shower, garden party themed websites ALL day waiting patiently for someone to ask me to tailor-design a dessert table. This was SO meant to be. And so the planning began...


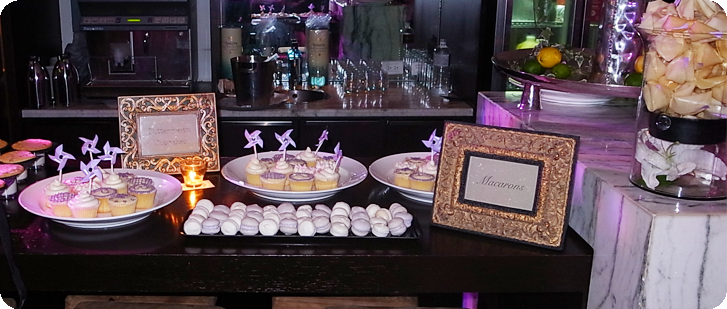
On the menu:
Raspberry Buttercream Macarons
Cheesecake Pops
Decorated Vanilla Cupcakes (topped off with Lavender & Silver pinwheels)
Fortune Cookies
Milk n' Cookie Shots (Vanilla infused Panna Cotta with Chewy Chocolate Chip Cookies)
I really didn't want to do the whole cupcake thing, I mean, let's face it - they're all over the place! BUT, the chocolate covered Cheesecake Pops were sweating out of their dark chocolate coats because of the summer heat, so I had to go with a quick fix. It was the first time I decorated cupcakes, and I must say, the blog-grazing finally came in handy when I had to sketch out the designs. I went with some simple and elegant themes and stuck with lavender and a soft cream color.

The fortune cookies were a huge head-ache. I could only make three at a time and each tray had to be baked for 15 minutes. After all the hard work, they ended up getting stale the second they cooled off from the oven. Please transport me to the Sahara now, dear Kitchen God.

Finally, I made them a bunch of raspberry infused macarons...those were on me, simply because I like to practice my Mac-skills, and let me tell you - practice does not make perfect with this French sweet.
If anyone wants any of the recipes that I used, let me know in the comments and I'll get back to you!
Enjoy!

4.17.2010


- Pour the 2 cups of warm water into a bowl. Sprinkle the yeast over the surface of the water and mix together lightly so all of the yeast particles are coated...I think that's the point of this. Anyway, you're trying to proof the yeast to make sure it's alive and kickin'. Let the mixture sit for 10 minutes.
- When you come back, it should have a thick-ish foam on top of the water. Yep, it stinks. If it has foamed, then congratulations, your yeast is alive, and it's probably going to be your friend today.
- Stir in the sugar.
- In a larger mixing bowl, mix together 4 cups of the flour and the salt. Just a reminder, salt will de-activate the capabilities of the yeast, so no direct contact!
- Pour the yeast and sugar mixture over the flour and begin to mix with a wooden spoon. The recipe I looked at called for a standing mixer, but I'm without my KitchenAid here in SH, so I rely on my guns.
- Slowly mix in another 1 1/4 cups of flour.
- No, sprinkle your work surface with lots of flour and drop your dough onto the counter.
- Knead (I recommend watching this on youtube - seriously) - pull up the dough and pressing down with the heel of your hand to form a ball. Do this for around 15 minutes. Feel free to throw it against the table...
- Place your ball of dough in a greased bowl and cover with a slightly dampened kitchen towel. Let it rise till it has doubled (40 minutes - 1 hour). The kitchen I was working in was actually quite cool, so I placed the bowl in an oven that was switched off, it sort of trapped the warmth of the dough in the oven? Meh I don't know, I'm not a professional!
- After it's doubled, punch down the dough.
- Divide into thirds.
- Set 2/3 of dough on your floured work surface and cover with some plastic wrap.
- With the other 1/3, cut into 16 pieces.
- Shape into bagels! youtube this please, but what I did was, ball up the dough in my palms and punched a hole with my forefinger and thumb. Then, I pulled at the sides of the hole to even it up.
- Let the raw bagels stand for around 20 minutes.
- Set the water and sugar to boil and grease your baking sheet. My sous-chef Jefferson added quite a bit of vegetable on to the baking sheet, this actually helped to crisp the base of the bagel I think!
- Preheat the oven now at 204 C or 400 F.
- After 20 minutes, turn down the water so it's just simmering, lightly drop 3 bagels at a time into the water.
- Cook for 30 seconds on each side. Larger bagels will need to cook for 1 minute on each side. They should be floating at the top while you do the cooking.
- Strain the boiled bagels and dry off on a paper towel.
- Place bagels onto the baking sheet and brush over with the egg wash. You can sprinkle some sesame, poppy seeds, garlic powder...etc over your bagels now if you'd like!
- Bake for around 20 minutes. Mine took about 17 minutes, but every oven will be different.
3.02.2010
Pineapple Tarts - Something Asian...finally

- Finely shred the pineapple till fine. This took me ages...my dad managed to take our dog out for a walk and when he came home, I was still on pineapple two. What can I say, perfectionista I am.
- Strain the pineapple till dry. Now that I think of it, I should have kept it for juice or something. So, do that - live and learn right? Save your pineapple juice, the lessons of life.
- Simmer the pineapple in a pan till the rest of the juice dries up.
- Add sugar and spices. Is that part of a country song perhaps?
- Keep stirring. Focus on those arm muscles. We'll all be body builders soon.
- When the mixture starts getting dry, add liquid glucose
- Stirrr till the jam is thick and sticky icky icky - and sort of dry
- Add the flour.
- Continue to stir until the jam is almost completely dry - it should take around 10 minutes.
- Let the jam cool off a bit and then shape into small ovals, around the shape of the first joint of your thumb. Is that even usable as a measuring device?
- Sift together all purpose flour, corn flour and salt
- Cream together the butter and the icing sugar with a mixer until it gets light.
- Beat in egg yolks one at a time.
- Add in the vanilla extract.
- Fold in the dry ingredients. Mix everything together until it forms a dough. It should still be light and crumbly though.
- Scoop out around a tablespoonful of dough, roll it into an oval, use your thumb to create a little well that big enough to fit the ball of pineapple jam.
- Place the ball of jam into the well and wrap the surrounding dough around the visible part of the jam to cover it completely.
- When you finish doing this with all of your dough and jam, you're actually ready to slip them in the oven already. BUT if you want to make them look like pineapples, click on the links above - you basically cut "v" shapes with a pair of scissors across the length of the dough and stick a clove on one of the ends!
- When you're done decorating...or whatever, brush the rolls with the beaten egg yolk.
- Bake for around 20 minutes or until they come out golden brown.
3.01.2010
Puff Piece: Cream Puffs


- Combine the milk, butter, sugar and salt into a saucepan over high heat and bring to a boil.
- Reduce the heat to medium and add the sifted flour all at once
- Stir well
- Gross right?
- Cook the grossness while stirring constantly with a wooden spoon. Before you know it, the grossness will pull away from the sides of the pan, takes around 5 minutes.
- Transfer to your standing mixer (paddle attachment) and beat on medium speed until it's cooled to body temperature.
- Add the eggs one at a time, beating well and scraping down the bowl with a rubber spatula after each egg.
- Beat in the egg white. It should be the consistency of cake-batter right now...if I did it correctly!
- Transfer the dough into a pastry bag.
- Pipe the dough into golf-ball sized balls onto the baking sheet.
- If you want, see below on how to Beard-Papa-ize these guys. If you want these puffs beard free, keep going...
- Brush the unbaked puffs lightly with egg wash (1 large egg whisked with 2 tbsp cold milk).
- Bake until the pastries are puffy and lightly browned (around 20 minutes)
- Lower the oven temperature to 162C/325F until they're a rich golden brown (another 20-25 minutes). SO MUCH WAITING.
- Remove from the oven and puncture a small hole in the side of each of the puffs. I learned this from another blog...you need a little hole on the side of the puff to help the steam release from the center. It's a big no-no to have moist-centered puffs, and that happens when the steam is trapped.
- Cream together the butter and sugar. I know...we're always creaming.
- Fold in the flour and cocoa powder.
- Put the dough on a piece of plastic wrap and press together to form a log - kind of like the icebox cookies that we made before...
- Chill the logs for at least 30 minutes or until the dough is stiff.
- Slice into around 20 portions, or however many puffs you are planning on baking.
- Place one chocolate slice on each of the (unbaked) puffs.
- Combine the cornstarch with 1/4 cup sugar in a mixing bowl, then stir in 1/2 cup of the milk.
- Blend the yolks into the cornstarch mixture.
- Stir with a wooden spoon until completely smooth
- Prepare an ice bath (dishes that are rich in eggs need ice bathes because it helps speed the cooling process to prevent scrambled eggs from happening). Use a large bowl, but make sure it can fit the mixing bowl your mixture is in. Add ice and then enough cold water to come halfway up the side of the mixing bowl that you'll want to cool down.
- Combine the remaining 1 1/2 cups milk with the remaining 1/2 cup sugar and the salt in a saucepan over medium heat and bring to a boil.
- Temper the egg mixture by gradually adding about one third of the hot milk mixture, whisking constantly.
- Add the remaining milk mixture into the eggs.
- Return the mixture to the saucepan (is this confusing? time to get organized!!!)
- Continue cooking over medium heat while stirring vigorously with a whisk until it comes to a boil and the whisk leaves a trail in the pastry cream (5-7 minutes).
- When you get to that point, remove from the heat and stir in the vanilla extract and the butter
- Transfer to the ice bath
- Stir occasionally until the cream is cool
- Spoon into a piping bag and fill the puffs!!